Baking bread is fundamentally good for the soul—and the only thing better than the therapeutic process of baking a fresh loaf is pulling it apart and eating it.
I absolutely love bread. From Middle Eastern flatbreads and airy Italian ciabattas to crispy French baguettes, nothing captures the senses quite like a deeply blistered, masterfully developed sourdough.
Sourdough is experiencing a massive, well-deserved resurgence.
There is simply no reason to settle for bland, bleached, chemically accelerated mass-produced supermarket loaves when you can cultivate a live bread right on your kitchen counter that tastes spectacular.

Beyond the depth of flavour, true sourdough delivers substantial health benefits.
The slow, natural fermentation process breaks down complex starches and phytic acids, making the finished loaf incredibly easy on the digestive system while unlocking vital nutrients from the grains.
Best of all, it requires only three basic ingredients: flour, water, and salt. Here is the definitive, step-by-step guide to mastering sourdough from scratch.
🍞 The Hiker’s Kitchen Sourdough Blueprint
The Core Formula:
500g Flour | 355ml Water | 160g Active Starter | 16g Fine Salt.
The Starter Runway:
6 days of passive cultivation to build a healthy, active wild yeast culture.
The Baking Schedule:
A structured, lazy weekend timeline—preparing the dough on Saturday and baking fresh on Sunday morning.
The Core Science:
Natural fermentation driven by wild yeasts and lactic acid bacteria, yielding a durable, mold-resistant loaf with a fantastic trail shelf life.
1. The Essential Bread-Baking Toolkit
While you can improvise with basic kitchenware, acquiring a few inexpensive, specialized tools will dramatically improve your consistency and execution:
Digital Scales: An absolute must-have. Unlike general cooking where you can estimate quantities, baking is a game of precision. Being gung-ho with measurements rarely ends well.
Proofing Basket (Banneton): A round proofing basket with a clean cloth liner is ideal for beginners. Round loaves (boules) are significantly easier to shape and build surface tension on than elongated shapes. Alternative: Use a large mixing bowl lined with a clean tea towel.
Dough Scraper: This quickly becomes a baker’s best friend. When managing wetter, stickier doughs, a scraper allows you to manipulate and move the mass cleanly without gluing it to your hands.

Baker’s Lame: A specialized slashing tool fitted with a razor blade. Scoring the dough creates a deliberate escape valve for steam during the “oven spring” (the rapid rise when cold dough hits a hot oven). It also allows you to carve clean, creative patterns into your crust.
Kilner Jars: Two 1-litre wide-mouth glass jars are perfect for cultivating, monitoring, and storing your wild starter culture.

2. Cultivating the Engine: The 6-Day Sourdough Starter
A sourdough starter is a living, breathing slurry of flour and water that naturally captures wild yeast microbes and beneficial bacteria from the environment.
Over a few days, these organisms break down the sugars in the flour, releasing carbon dioxide (which creates the bubbles and lifts the bread) and lactic acid (which provides that signature sour tang).
Starter Requirements:
- 400g Strong bread flour (Note: Splitting this 50/50 with wholemeal or rye flour works exceptionally well).
- 425ml Tepid water
- 2 Clean Kilner jars with loose-fitting lids
The Day-by-Day Feeding Routine:
Day 1: Combine 50g of strong bread flour and 50ml of tepid water directly inside your first jar. Stir vigorously until all dry pockets disappear. Rest the lid loosely on top (do not seal it tight, as gases need to escape) and leave it at room temperature for 24 hours.

Day 2: Place a clean second jar on your scales. Pour exactly 50g of yesterday’s starter mix into it, discarding the remainder. Add 50g of fresh flour and 50ml of tepid water. Stir thoroughly, cover loosely, and rest for 24 hours.
Day 3: You should begin to spot minimal signs of life—isolated tiny bubbles along the glass. Weigh 50g of the mixture into a clean jar, discard the rest, and feed with 50g of flour and 50ml of water. Rest for 24 hours.
Day 4: Repeat the exact process of Day 3, keeping the yeast stabilized.
Day 5: The mixture should show clear activity now, smelling slightly fruity and sour. It will begin bubbling and crawling up the glass. Today, you must increase the feeds to twice a day (roughly 12 hours apart), morning and evening. For each feed, transfer 50g of starter into a clean jar, add 50g of flour and 50ml of water, and mix well.
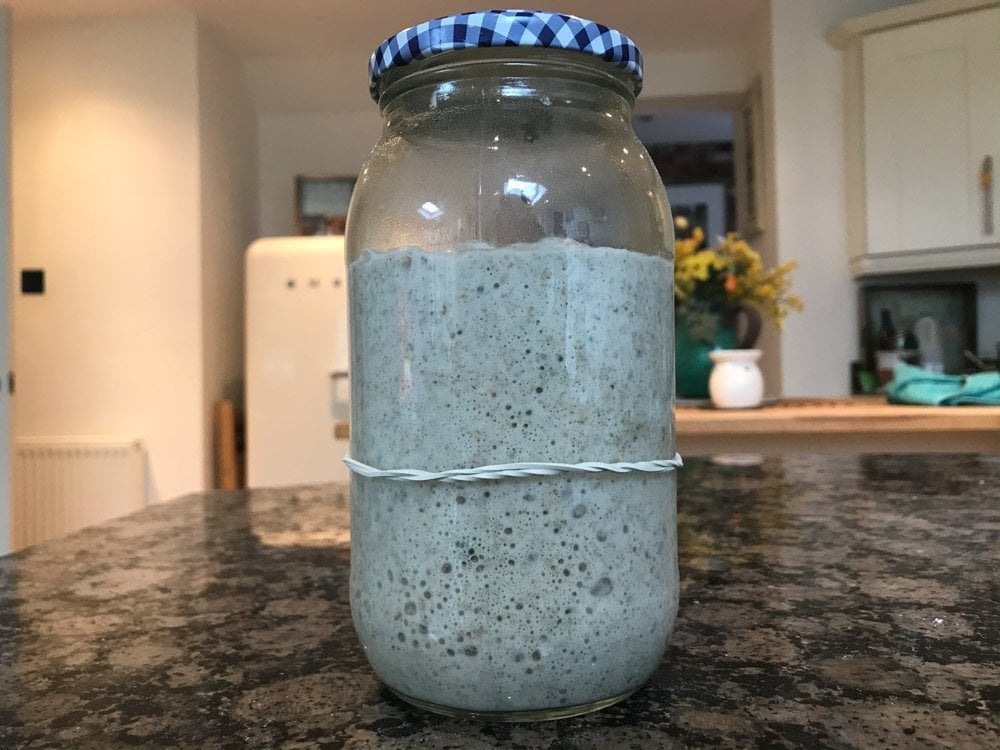
Day 6 (The Verification Day): Clean your jar. Mix 75g of starter, 125ml of water, and 100g of flour (if you have rye flour, use 50g white and 50g rye—rye acts like rocket fuel for wild yeast).
The Elastic Band Test: Snap an elastic band around the jar at the initial height of the mixture. Check it 6 hours later. If the mixture has successfully doubled in height above the band, your starter is fully mature and primed to bake a loaf.
If it hasn’t quite reached that threshold, simply continue the twice-daily feeds for another 2 to 3 days.
Managing Hibernation
Since few home bakers create bread every single day, you can easily put your starter into hibernation.
Mix 38g of starter, 62ml of water, and 50g of flour into a clean jar, seal the lid, and store it directly in the refrigerator. It can stay inside the cold environment for weeks.
When you are ready to bake again, bring the jar out of the fridge, allow it to warm to room temperature for 12 hours, and run the twice-daily feeding cycle for 48 hours to restore its full vigor before mixing your dough.
3. The Definitive Sourdough Recipe & Timeline
How To Make Sourdough Bread – A Beginner’s Guide
After the starter is ready here is the recipe for making your sourdough bread loaf.
1
large loaf11
hours42
minutes230
kcalIngredients
500 g Strong white bread flour (Advanced option: Swap out 100g for Spelt flour to add a rustic, nutty texture).
355 ml Tepid water
16 g Fine Sea salt
160 g Active, mature sourdough starter
Directions
- DAY 1: The Dough Development (Saturday)
- 9:00 AM — The Starter Refresh: Pull your active starter jar out and feed it thoroughly according to the Day 6 measurements to ensure it is highly active, bubbly, and ready for action by midday.
- 12:00 PM — The Autolyse: In a large mixing bowl (or a square 30cm x 30cm plastic container with a lid), combine your 500g of flour and 355ml of water. Mix with a sturdy spoon or dough scraper until all dry flour is fully absorbed into a shaggy mass. Cover and leave completely undisturbed for 3 hours at warm room temperature. This activates the natural enzymes, developing the gluten network passively and making the dough significantly more pliable and less sticky to handle.
- 3:00 PM — Incorporating the Starter: Prepare a bowl of clean water to wet your fingers to prevent sticking. Gently stretch your rested autolyse dough out into a flat rectangle inside your container. Pour the 160g of active starter evenly over the surface, then fold the outer edges of the dough cleanly back over the center until you have reformed a neat, wet square block. Cover.
- 3:30 PM — The Salt Integration: Stretch the dough out into a square once more. Sprinkle the 16g of fine salt uniformly across the surface. Fold the edges back over into a tight block, covering it for 30 minutes to allow the salt grains to naturally absorb into the hydration matrix.
- 4:00 PM to 6:30 PM — The Stretch and Folds: To build structure and ensure an even distribution of air bubbles, you will execute a series of stretch-and-folds every 30 minutes over the next 2.5 hours (3 to 4 cycles total). Wet your fingers, lift one side of the dough firmly upward as far as it will stretch without tearing, and fold it back over itself. Rotate your container 90 degrees and repeat on the next edge. Do this for all four quadrants twice. Cover and rest for 30 minutes between sets. (Optional: Introduce a dynamic ‘slap and fold’ maneuver on a clean work surface during your final two sets). Do not add extra flour.
- 6:30 PM — Shaping the Boule: Scrape the wet, sticky dough out onto a lightly floured work surface. Flour your hands and shape the mass into a smooth ball (boule). Pull the outer edges up into the center, flip the mass over so the smooth skin faces up, and use your palms to cup and pull the dough toward your body across the counter. This friction tightens the outer skin, creating critical surface tension. Rest for 10 minutes, then repeat the exact cupping and pulling sequence once more.
- 6:40 PM — The Overnight Cold Retard: Generously dust the cloth lining of your round proofing basket using white flour mixed with semolina or rice flour. Carefully place your shaped boule into the basket seam-side up. Cover the entire setup inside a clean plastic bag to seal in moisture and place it directly into the refrigerator overnight.
- DAY 2: The Morning Bake (Sunday)
- 8:00 AM — The Thermal Preheat: Turn your domestic oven to its maximum heat setting (245°C–250°C). Place your empty, heavy cast-iron Dutch oven (casserole dish) with its lid on inside the center rack. Let it preheat for a full 45 minutes to saturate the iron with heat. (Note: If you don’t own a Dutch oven, preheat a pizza stone or baking tray, and place a deep roasting tray on the bottom oven floor ready to receive boiling water for self-steaming).
- 8:45 AM — Scoring and Entering the Oven: Remove your cold proofing basket from the fridge. Lay a sheet of baking parchment over the basket, invert it onto your counter, and gently lift the basket away. Using a baker’s lame or a razor blade, execute a swift, confident, 1/4-inch deep cross-cut across the top surface of the dough. Speed is vital here to ensure the cold dough doesn’t spread out and lose its structural shape.
- The Bake: Carefully lower the dough and parchment into the roaring hot cast-iron pot, clamp the heavy lid on tight, and slide it into the oven. Drop the temperature setting to 240°C and bake for 20 minutes under the lid (trapping the natural steam to maximize your oven spring expansion).
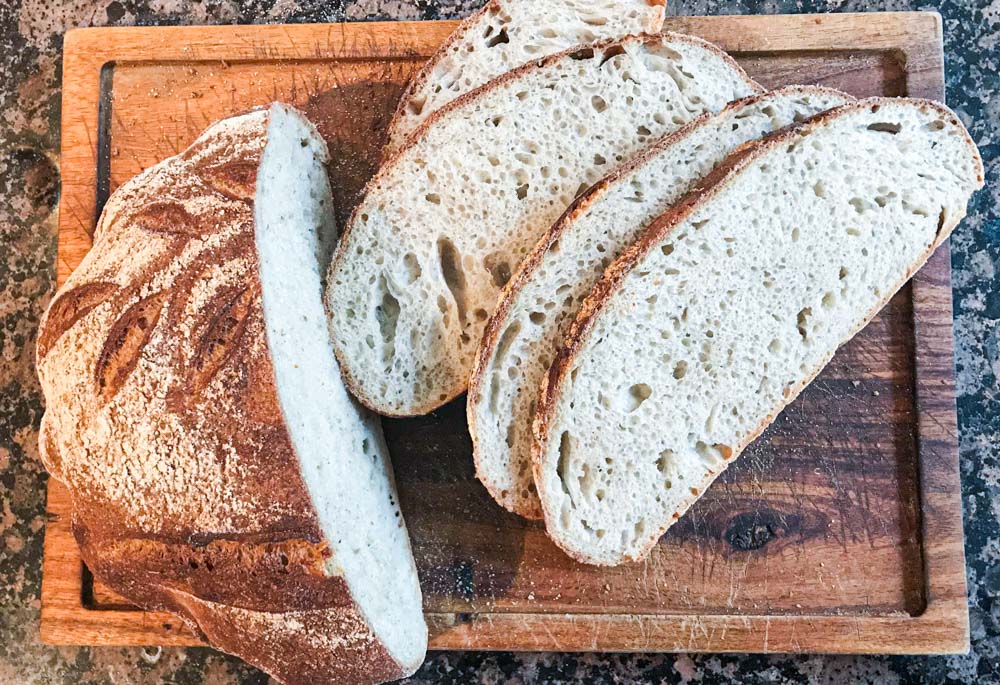
- The Golden Finish: After 20 minutes, carefully remove the heavy iron lid. Drop the oven temperature down to 225°C and continue baking uncovered for an additional 12 minutes. Keep a close watch; you are looking for a deep, mahogany brown color where the scored edges are starting to beautifully caramelize.

- The Recovery Cooling: Remove the loaf from the oven and transfer it immediately onto a raised wire cooling rack. Allow it to sit completely undisturbed for a minimum of 90 minutes to two hours. Slicing into it hot will trap internal steam and turn the interior crumb gummy. Once cooled, slice thick wedges, slather with local butter or honey, and enjoy the ultimate reward of slow-crafted outdoor fuel.

Explore More High-Energy Recipes & Fuel Guides from the Hiker’s Kitchen
- The Skillet Classic: Easy Focaccia Style Bread Recipe: A Baker’s Field Manual
- The Low-Carb Recovery: Keto Broccoli and Cauliflower Cheese Recipe: A Quick Trail Side
- The Endurance Breakfast: Fully Loaded Winter Porridge: Sustained Energy for the Fells


Hey Paul
I’ve been using your recipe since I started baking sourdough and even the “failed” attempts were edible – just not so pretty 😛
A question please: on Day 6 you say that we can refrigerate the starter and then when we’re ready to use it we can simply repeat day 6. Does that mean: take it out of the fridge and feed it as if you are going to prepare the dough today and bake it tomorrow?
(have I been generating excess discard for no reason lol)
Cheers
Paul
Hi there
Glad to hear that the recipe has been working well, even the ‘fails’.
In response to your post-refrigeration question then you probably need to give it a day or two of regular feeds to come back to life with vigour it was was working pre-refrigeration. As with all bread baking, there are many variables with temperature being a key one. I would take out of the fridge and then leave it half a day to come back to room temperature, and the restart the feeding process. I’m usually baking 72 hours post-fridge but have done it on day 2 before now. A dollop of unsweetened yogurt can help give your starter a boost.
Happy baking!
Paul
Hi Jeremy
Thanks for your feedback and I agree, homemade sourdough is one of life’s pleasures.
Happy baking
Paul
Great recipe. homemade sourdough bread is the best. Thanks for sharing.