There is a familiar disappointment known to almost every hiker who packs a packed lunch for a big day on the fells.
You climb for three hours, reach a spectacular, wind-swept summit, unzip your rucksack, and pull out a squashed, soggy, utterly uninspiring supermarket sandwich.
Standard sliced bread simply isn’t built to survive the inside of a backpack.
That is exactly why a rustic, home-baked specialty loaf is a game-changer for your trail lunch.
Standard Shop Sandwich ───► Squashed & Soggy in Rucksack ❌
Sturdy Specialty Loaf ───► Retains Shape & Packed with Flavor ✓
This Mediterranean-inspired olive and tomato bread is specifically built for the trail.
It features a dense, sturdy crumb structure that handles being jostled around in a pack without crumbling to pieces.
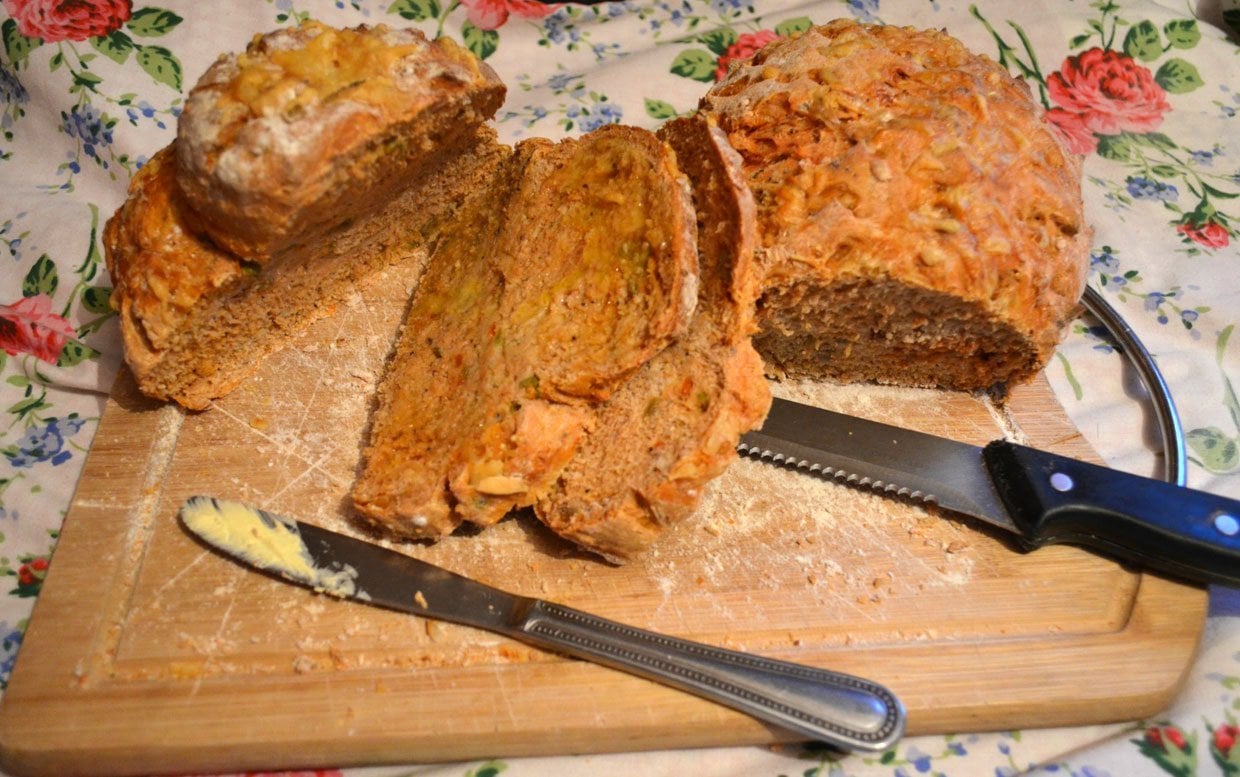
Packed with the rich, savoury punch of kalamata olives, sun-dried tomatoes, and dried rosemary, it tastes incredible when eaten out in the open air, providing a fantastic, slow-release carbohydrate boost to power your descent.
🍞 The Summit Loaf Snapshot
|
Trail Metric |
Target Setting |
Why It Matters For Your Pack |
|---|---|---|
|
Durable Texture |
Sturdy, Tight-Crumb Boule |
Won’t squash or turn to dust under the weight of your waterproofs. |
|
Shelf Life |
3 to 4 Days |
Stays naturally moist and flavorful, making it perfect for multi-day wild camping treks. |
|
The Flavour Boost |
Salty Olives & Tangy Tomatoes |
Cuts through trail fatigue and replenishes lost sodium without needing extra condiments. |
|
Bake Style |
High-Heat Cast Iron or Tray Bake |
Creates a thick, protective crust that acts as natural armor inside your rucksack. |
🎒 Why Savoury Breads Rule the Fells
When you are working hard on a steep incline, your body continuously burns through glycogen stores.
While sweet snacks like flapjacks and dried fruit are great for a quick burst of energy, your palate can quickly suffer from “sugar fatigue” on a long trek.
You find yourself craving something deeply savory, salty, and satisfying.
This loaf delivers on all fronts. The black olives provide a natural dose of healthy monounsaturated fats and essential dietary sodium to help prevent muscle cramps.
Meanwhile, the sun-dried tomatoes are packed with antioxidants and a concentrated, tangy sweetness.
Because the ingredients are baked directly into the dough, you don’t need to worry about carrying separate tubs of butter, mayo, or sandwich fillings that can spoil in the midday heat.
Just slice it, pack it, and tear it apart on the summit.

🧭 The Master Baking Sequence
You don’t need to be a master artisan baker to nail this recipe. The secret is adding the wet ingredients (the olives and tomatoes) after the dough has done its initial rise. This ensures the moisture from the tomatoes doesn’t interfere with the yeast activation, resulting in a perfectly uniform rise.
1.Step 1: Knead the Base Dough: Time: 15 mins.
Combine 500g of strong white bread flour, 1 sachet of dried yeast, and 1 teaspoon of sea salt in a large bowl. Pour in 300ml of lukewarm water and 2 tablespoons of the oil from your sun-dried tomato jar (this infuses the whole loaf with incredible flavor). Knead for 10 minutes until smooth and springy.
2.Step 2: The First Rise: Time: 1 Hour.
Place your smooth dough ball into a lightly oiled bowl, cover it with a damp tea towel, and leave it to rest in a warm room for one hour until it has doubled in size.
3.Step 3: Fold in the Trail Flavors: Time: 5 mins.
Punch the risen dough down to release the air. Scatter your chopped kalamata olives, chopped sun-dried tomatoes, and dried rosemary over the top. Gently fold and knead the dough for a minute or two until the savory toppings are evenly distributed throughout.
4.Step 4: Shape and Second Rise: Time: 30 mins.
Shape the dough into a tight, round rustic ball (a boule). Place it onto a baking tray lined with parchment paper, cover loosely, and let it puff up for another 30 minutes while you preheat your oven to 220°C.
5.Step 5: The Crust-Building Bake: Time: 30-35 mins.
Dust the top of the loaf with a tiny bit of extra flour and use a sharp knife to slash an ‘X’ into the top. Bake at 220°C for 30 to 35 minutes until the crust is a deep golden brown and the bottom sounds hollow when tapped.
Let it cool completely before packing.

Savoury Olive and Tomato Trail Bread
Home baked bread can be a real pleasure to make and eat. I enjoy specialty bread with tomatoes, olives, cheese or combination
1
Large Rustic Loaf20
minutes35
minutes265
kcal90
minutesIngredients
500 g Strong White Bread Flour
7 g Fast-Action Dried Yeast (1 sachet)
1 tsp Fine Sea Salt
300 ml Lukewarm Water
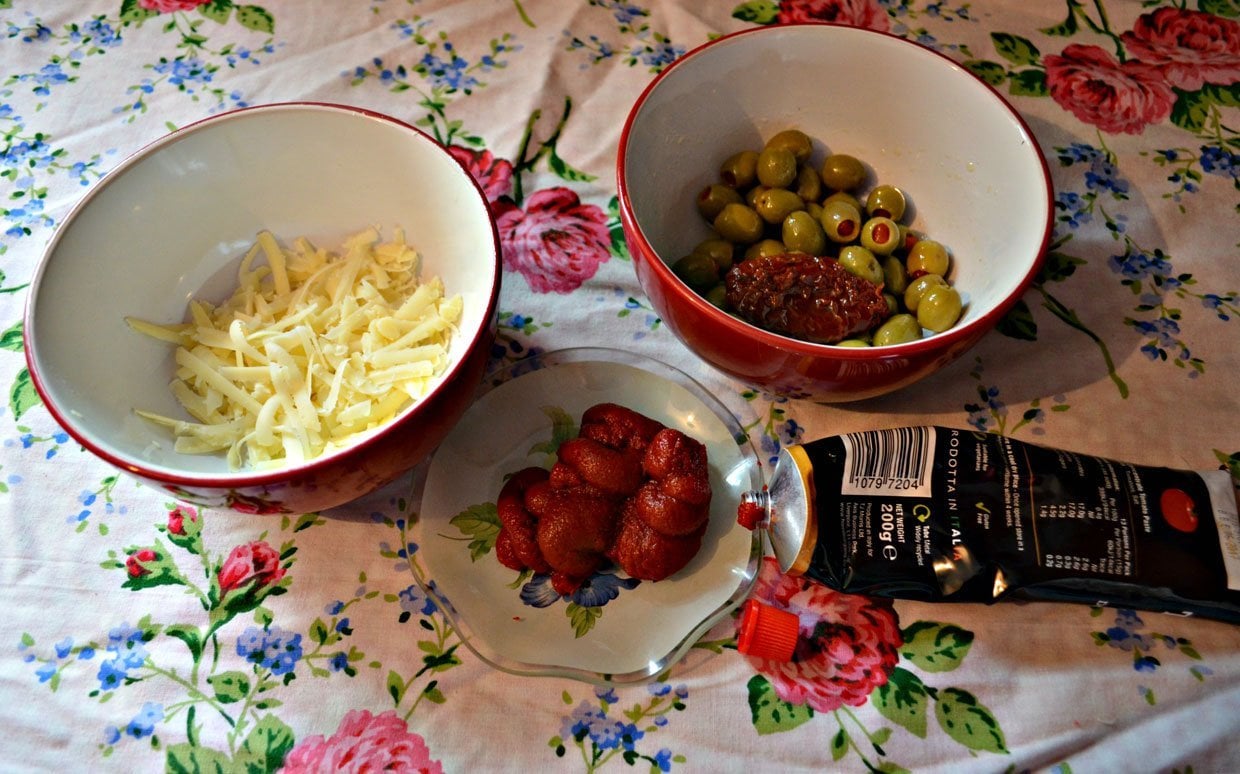
2 tbsp Sun-Dried Tomato Oil (reserved from the jar)
100 g Olives (pitted and roughly chopped)
100 g Sun-Dried Tomatoes (drained and roughly chopped)
1 tbsp Dried Rosemary (or chopped fresh rosemary)
Directions
- Mix: Combine flour, yeast, and salt in a large bowl. Pour in the lukewarm water and the sun-dried tomato oil. Stir until a rough dough forms.
- Knead: Turn out onto a floured surface and knead for 10 minutes until smooth, elastic, and springy to the touch.
- First Rise: Place in a greased bowl, cover with a damp cloth, and let rise in a warm spot for 1 hour until doubled in size.
- Incorporate Toppings: Punch down the dough. Flatten it out slightly and scatter the chopped olives, sun-dried tomatoes, and rosemary over the surface. Fold the dough over itself and knead gently until the ingredients are fully integrated.
- Shape & Bake: Shape into a round loaf and place on a baking sheet lined with baking paper. Rest for 30 minutes. Preheat oven to 220°C. Slash the top of the loaf, then bake for 30-35 minutes until golden brown and hollow-sounding on the base. Cool completely on a wire rack before slicing.


